Public Channels
- # 2022-summerschool-introtometagenomics
- # 2023-summerschool-introtometagenomics
- # 2024-acad-aedna-workshop
- # 2024-summerschool-introtometagenomics
- # amdirt-dev
- # analysis-comparison-challenge
- # analysis-reproducibility
- # ancient-metagenomics-labs
- # ancient-microbial-genomics
- # ancient-microbiomes
- # ancientmetagenomedir
- # ancientmetagenomedir-c14-extension
- # authentication-standards
- # benchmark-datasets
- # classifier-committee
- # datasharing
- # de-novo-assembly
- # dir-environmental
- # dir-host-metagenome
- # dir-single-genome
- # eaa-2024-rome
- # early-career-funding-opportunities
- # espaamñol
- # events
- # general
- # it-crowd
- # jobs
- # lab-community
- # lactobacillaceae-spaam4
- # little-book-smiley-plots
- # microbial-genomics
- # minas-environmental
- # minas-metadata-standards
- # minas-microbiome
- # minas-pathogen
- # no-stupid-questions
- # papers
- # random
- # sampling
- # scr-protocol
- # seda-dna
- # spaam-across-the-pond
- # spaam-bingo
- # spaam-blog
- # spaam-ethics
- # spaam-pets
- # spaam-turkish
- # spaam-tv
- # spaam2-open
- # spaam3-open
- # spaam4-open
- # spaam5-open
- # spaam5-organizers
- # spaamfic
- # spaamghetti
- # spaamtisch
- # wetlab_protocols
Private Channels
Direct Messages
Group Direct Messages

@James Fellows Yates has joined the channel


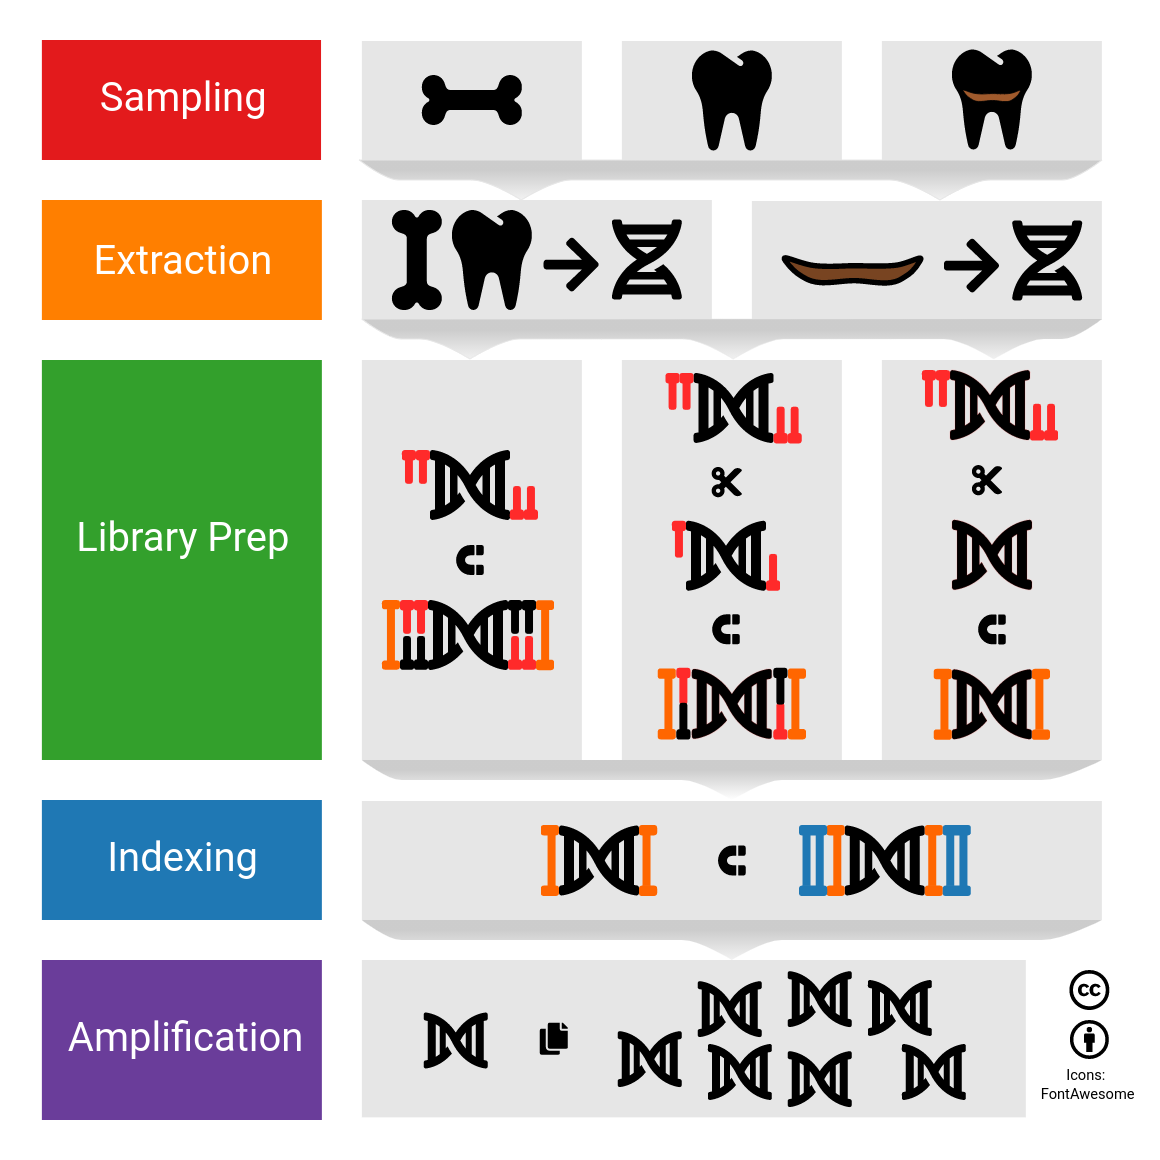
[Self advertisement] open sampling protocols of teeth and calculus to get the ball rolling: https://dx.doi.org/10.17504/protocols.io.bj8nkrve
Does tried those protcools out? Have had any feedback ? Or any suggestions based on their own protocols how we could improve the above?


@Meriam Guellil has joined the channel

@Katerina Guschanski has joined the channel


@Maria Lopopolo has joined the channel

@Sterling Wright has joined the channel


@Miren Iraeta Orbegozo has joined the channel


@Nikolay Oskolkov has joined the channel
Hello, Thanks @James Fellows Yates for creating this channel. I am a drilling/sampling newbie and I am encountering the first issues in sampling the dental pulp from the inner chamber of the tooth. Some teeth (especially molars and pre-molars) seem to be quite hard to access. I am finding it very hard to pierce the inside of the crown even with a diamond thin tip. Does anybody have a good tip on how to have a very good grip on the crown while doing this process + if somebody has a video while doing it it would be amazing if it could be shared! Cheers, Maria.
or @Maria Spyrou (as people I know who regular sample for pulp)
Hey @Maria Lopopolo: we used regular pliers for holding the sample in place and them decontaminated everything with DNAway and UV after each drilling. We found that without a tool, we'd be risking our limbs and massive blood loss, which would cause even more contamination
*Thread Reply:* Right, particularly when you have only 1 brilliant student and 2 hands each
*Thread Reply:* Yes definitely, thanks for the tip we are using something similar to pliers now because indeed I would also be afraid of losing a finger tip 😄 + DNA away is a must. I would be interested more in understanding how the drilling of the pulp works because so far I am nowhere near 50mg more like 15mg to nothing 😄 how deep do you drill down in the crown and how much strength do you apply? this is my main enigma…
*Thread Reply:* @Gunnar Neumann are you also here?
*Thread Reply:* (he was one of one of the main writers of the shh protocol iirc)
*Thread Reply:* I don’t think we ever reached 50mg with our dental calculus samples. Most of them were around 5mg (our detection limit with the lab scale). But then of course it’s dental calculus and not pulp. Would be curious to hear from others if 15 mg is sufficient.
*Thread Reply:* yeah Jena normally aim for 50mg AFAIK. you can go down to even 1g (or practically invisible for Neanderthal stuff) for calculus, but only because it's so rich...
*Thread Reply:* I think Maria was asking about Dental Pulp (the inner chamber of the tooth), not dental calculus… Correct me if I am wrong @Maria Lopopolo
*Thread Reply:* Yes, but that's the point. It seems most people needs 50mg for pulp. You might be cutting it very fine at 15mgs

*Thread Reply:* Hi @Maria Lopopolo, sounds like you access the pulp chamber with the drill, if i understood correctly? I normally cut the teeth open with a saw blade and then the pulp is very easy to access. depending on the size of the tooth you can then easily get 50 mg. However, it also depends on what you are looking for. If you go for human DNA, then you can easily just drill out enough material. But when looking for pathogen DNA i try to sample just from the surface of the pulp chamber. sometimes also drill into the roots to get enough powder… my 5 cents on this.
*Thread Reply:* Hi @Gunnar Neumann I access the pulp chamber sawing at the CEJ (transversally ) and then from there I have the root and the crown separated and I can clearly see the inner chamber surface. My problem was I think that I found it quite difficult to access and I think is because I am not putting enough strength the surface seemed quite hard to drill. The main question is indeed for how long and how deep you drill into the crown to access the powder? I got pliers now so I hope my grip will be better and can apply more force!
*Thread Reply:* I hope the pliers help. In any case it will be much safer! so far i have seen differences in consistence.. sometimes it was harder, sometimes soft like butter. i guess it depends on sample preservation a lot. However, I never hard super hard times to get enough powder for extraction.
*Thread Reply:* Ok great, thank you very much indeed for all the feedback!
@Gunnar Neumann has joined the channel

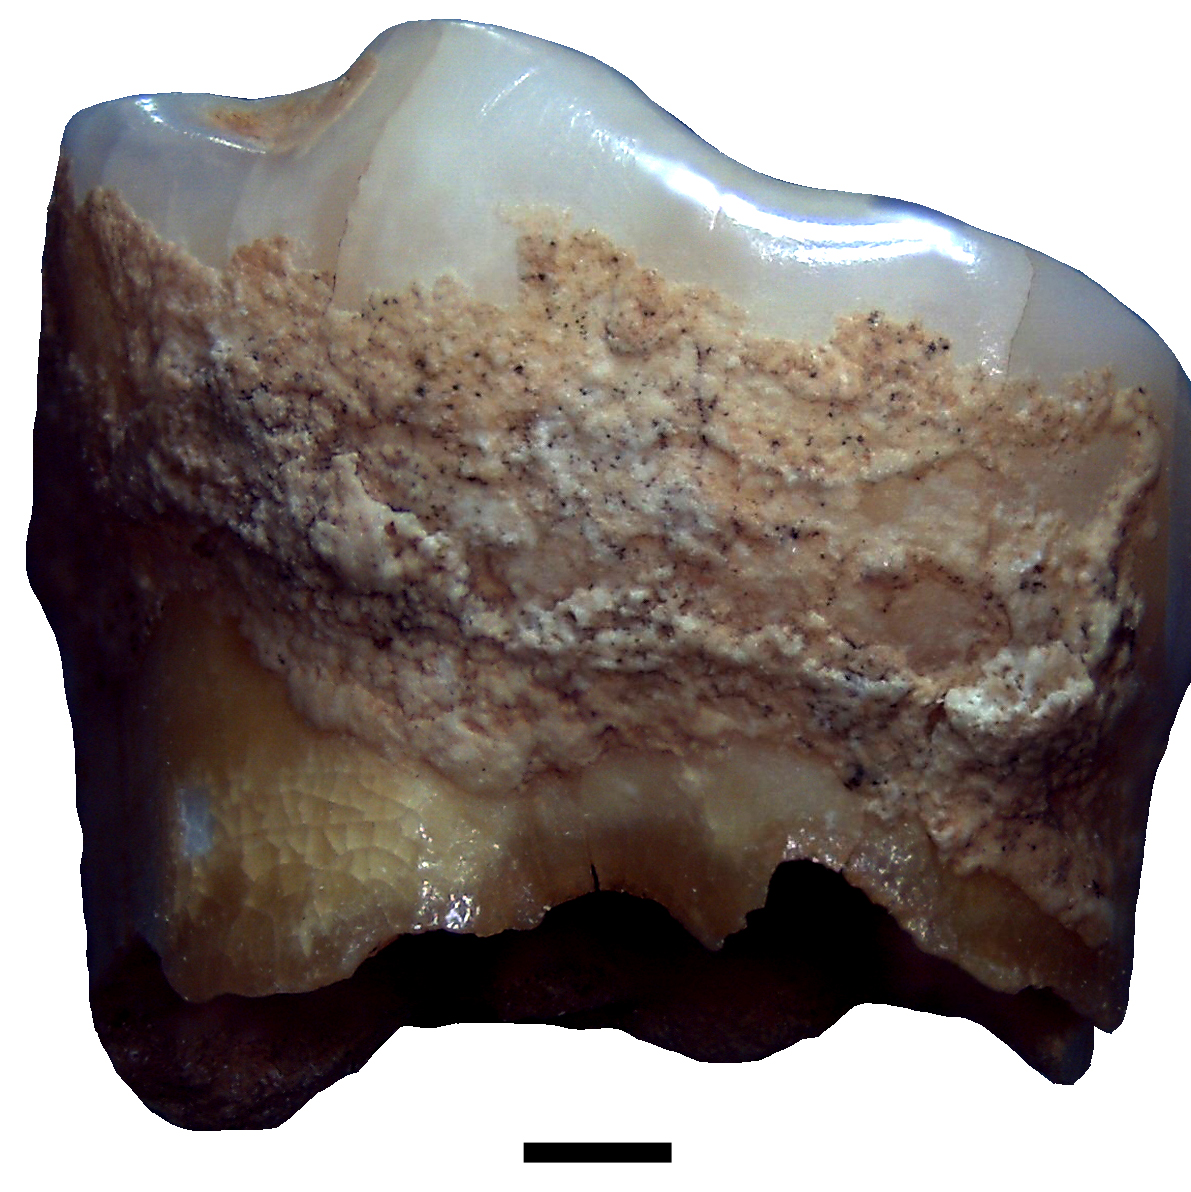
Hello!! I came across this interesting tooth. Any idea of what the white little bump below the crown is? on the other side there was also something that looks like caries. So I am hoping is some sort of reaction to inflammation…I am really interested in knowing what you think about it and how would you sample this tooth? Cheers!


*Thread Reply:* Could it be a pulp stone coming out of the tooth? I had one a while back and it was extremely hard to drill into the pulp - ended up drilling the tip of the root
*Thread Reply:* @Betsy Nelson?
*Thread Reply:* The brown thing is either caries or something like grooves from tool use, i think (it's very very straight)
*Thread Reply:* oh I see! will check the archaeological context!
*Thread Reply:* Don't hold me to the second though 😬
*Thread Reply:* I think it is more likely caries

*Thread Reply:* The white thing I don’t know, I’ve never seen that before, although it does make me think of something formed in response to infection. The brown hole looks like caries, although it may have started by wearing down with a tool like James mentioned, and then gone carious when it wore through the enamel and into dentin
*Thread Reply:* @Maria Lopopolo Looks like an enamel pearl to me. It’s developmental and is not caused by infection, but can be a pre-disposing factor to periodontal disease in the affected area
*Thread Reply:* Ok I have got food for thoughts now. It certainly looked interesting but as I haven’t seen so many teeth I did not know if it was a common trait to see in teeth! thanks a lot! 🙂
*Thread Reply:* I'm so late to this thread but I answered @Maria Lopopolo’s email in time (hopefully) - @Åshild (Ash) is exactly right it's an enamel pearl.
Hello, I have a couple of questions:
- do you have a tip on how to reduce the possibility of breakage when handling molars? I find them particularly difficult to handle when I have to cut at the CEJ because they have uneven roots therefore I find it easy to break. Is there an alternate way to do the same cut without breaking the roots? For example I have been holding them with pliers from the roots but can they be hold from the crown instead?
*Thread Reply:* Hi Maria, based on my experience, I have always held teeth from the crown. Also, when teeth have cracks on them, there is usually little one can do to avoid breakage when sectioning. I find that using an electric rather than manual saw has generally helped with that but not always. If you want to absolutely avoid breakage I would suggest drilling from the outside if you have fragile teeth, e.g. from the bottom of the root.
*Thread Reply:* Hi Maria, thank you very much for the tips! I will try from the crown! Thanks for answering my very basic questions :)
- I found a tooth that was completely black both the crown and full of black spots on the roots (see pictures). what can you say about this tooth? I would think it’s caries given some sign of a hole next to the broken part of the crown


*Thread Reply:* Hi @Maria Lopopolo! The black discoloration could be from iron and/or manganese dioxide. The second image with the broken enamel deep cavity looks like it could be a carious lesion - but that's a little difficult to see.
Hello to all. Yesterday we were discussing with @Maria Lopopolo @Betsy Nelson @Freddi Scheib and @Miren Iraeta Orbegozo about the processing of ancient dental calculus, particularly for the DNA extraction step. Some of them were using a pre-digestion step before extracting DNA, while others don’t. And in both cases there were reasonable explanations on why to do it one war or another. Any thoughts on this from the other people doing dental calculus processing?

What sort of pre-digestion step are you referring to?
Sorry, do you mean pre-digestion as a step of contaminant removal?
*Thread Reply:* Yes I think that's why they do it
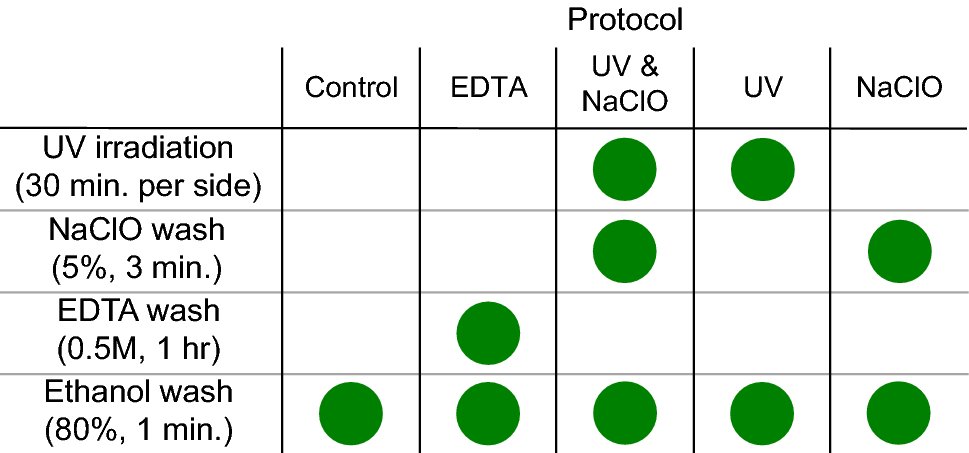
*Thread Reply:* In my lab we don't do pre-digestion on tooth roots (but we bleach them /rinse them); but on calculus we have been doing a quick EDTA pre-digestion
*Thread Reply:* We have definitely observed increased proportion of “oral” taxa following UV exposure and EDTA wash (Brealey et al. 2020 MBE reports this)
Initial thoughts from me/@Christina Warinner 's group (who can tell me off I get anyting wrong):
1) calculus is often extremely rich in microbiome DNA when it does preserve well, so it's arguably not as crucial as in e.g. pop-gen studies to decontaminate 2) That's why we do a short EDTA 'wash' to remove surface contamination, which is I guess sort of a pre-digestion step. In Ozga 2016 AJPA I think they showed it gave improved yield (will check in a sec) 3) The only other 'pre-digestion' we do is an acetone surface wash if there is evidence of glue on there, so it doesn't clog columns

*Thread Reply:* Calculus poses challenges for decontamination. It’s generally pretty dense, so it doesn’t have the problems with microbial tunneling thats bone or teeth have (due to bone porosity and dentine tubules), but it can still be fairly dirty and dusty. And dental calculus can develop microcracks, and in my 2014 paper, we showed that these cracks fill up with soil. In the same study, I developed the EDTA wash approach to deal specifically with this issue - basically to wash off the dust/dirt from the surface and cracks. It’s not perfect because when you pull the calculus off you expose not only the outer surface but also the surface that was against the teeth. But if you keep the wash very short, you really should just pull off things on the surface/cracks. In that study, the calculus preservation was excellent, so when we analyzed the wash, it basically had the same bacteria as the interior calculus - lots of oral bacteria - but I think it is helpful for less well preserved calculus. The only case where I would not use it is if you are interested in pathogen DNA because presumably this is on the surface (deposited just before death and before full calcification)
*Thread Reply:* Yes, acetone is for removing synthetic adhesives. Basically to remove consolidating agents added by museum conservators
*Thread Reply:* Also, the EDTA wash is a “no loss” approach, because you can always keep and analyze the wash. This gives it an advantage over bleach, which destroys everything. Technically, you could also decontaminate your calculus by soaking it in bleach, but while that might be fine if you have a 20 mg chunk of calculus, I can’t imagine ever doing that to a 1 mg sample of Neanderthal calculus. Too risky!
*Thread Reply:* So we used the EDTA wash approach to keep everything consistent and “safe”
*Thread Reply:* @Nico Rascovan if you didn't see ☝️
*Thread Reply:* Awesome!! Thanks to both!!! Very useful!
Ok they don't describe the results in Ozga 2016, but it's what Tina said and @Katerina Guschanski and Jaelle also find it proves endogenous
I guess maybe generally it washes out other gunk that might be trapped in teh bumpy/porous surface
*Thread Reply:* Yes I think it helps reduce soil noise
*Thread Reply:* Yes, that’s the idea. It is helpful when the calculus is really dusty
To add to @James Fellows Yates: we routinely do UV + EDTA wash for all (non-human) DC samples
This is why this SPAAM slack and this particular channel is so good! Thanks a lot to all
Hey all, question about dental calculus sampling from what appears to be a specimen completely encrusted with dirt. I believe to see calculus deposits on the teeth but wonder how one would try to get rid of the reddish clay (?) prior/after sampling? Any and all recommendations are welcome!

I was literally reading this two hours ago: https://doi.org/10.1016/j.jas.2015.04.003
And they just said they brushed it off with a tooth brush:


Thanks @James Fellows Yates ! For now only see the photographs, so cannot tell how hard it really is. I'm so tempted to just bathe it!
Yeah... I would personally recommend brushing off as much as you can, and then do a pre-treatment wash (e.g. in water and/or EDTA) before extraction I guess...? But it owuld be nice to get off as much as possible before extractin then 🤔
Sure thing! Otherwise it will be a really nice soil study!
*Thread Reply:* I’d brush it off with a damp toothbrush
I wonder if you could sand blast it slightly...
But might damaged the calculus I guess
@Christina Warinner do you have any experience of that?
*Thread Reply:* I wouldn’t soak it in water, but you can brush it with a wet toothbrush
*Thread Reply:* @Katerina Guschanski ☝️
*Thread Reply:* Thank you! That's really helpful
I join the DC peeps with one more question: would UV light the tooth with DC on it for 5-10 mins be dangerous for it in term of loss?
*Thread Reply:* I think that’s rather long. I would just do 1 minute on each side
*Thread Reply:* Keep in mind that the longer you UV them, the hotter they get
*Thread Reply:* Thank you for the recommendation @Christina Warinner I will keep that in mind!
At least I'm pretty sure that's what we did 😅
Ah no, only about a minute: https://www.protocols.io/view/ancient-dna-extraction-from-dental-calculus-with-c-bqbmmsk6
For around 5mg samples (so small?
https://journals.plos.org/plosone/article?id=10.1371/journal.pone.0013042
That said UV isn't that powerful unless the bulb is right next to the surface so 🤷♀️
Wanna test @Maria Lopopolo? 😜
This paper UVd samples for 30 min and was still got okay results. It was quite as good as the UV and bleach treatment that we applied. But I wouldn’t recommend putting them in UV for that long.
https://www.nature.com/articles/s41598-021-86100-w
Hello, all I have a couple of questions regarding sampling root apex. 1.what do you think this black-ish consolidation is on this tooth? It did not come off even after decontamination with bleach, ethanol and UV. 2. how to sample a single root apex on a tooth where some junk won’t come off of it even with decontamination? What are you recommendations? Thanks!!


Can you sample outside of the coloured region?
*Thread Reply:* do you mean on the root portion soon above that? would it be as informative (e.g. human DNA and pathogen traces)?
*Thread Reply:* The majority of the nucleated cells would be in the apex, but there will likely still be host and pathogen cellular material in the not discoloured root portion above
*Thread Reply:* We have had many successful extraction from the cementum portion of the root well above the apex, admittedly not from humans
*Thread Reply:* Thank you @Freddi Scheib and @Katerina Guschanski
I would sample it and just include the blackened portion with a bit above, it might just be mineral discolouration, but I'm not sure